Tuesday, June 30, 2009

June 29, 30, 2009: Hardwood and Gutters (and window frames)

I got out to the house on the 29th (Monday) and the 30th (Tuesday), but only had a chance to post pictures today so there's a little bit of a mix.

This week, trim is going up around the windows, the flooring is starting, and the gutters are going up on the outside.


Silver checks out the hardwood (oak) going in the great room and the dining room. We looked at bamboo initially, but didn't like the colors it came in and didn't have the option of staining it ourselves. There will be tile in the foyer, so there's a kinda square cutout there. In case you're curious, the subfloor (black) is asphalt felt and the board direction is perpindicular to the floor joists. (A quicky how-to guide is here.)

Detail of the 45 degree (mitred) joint at the corner of the foyer tile area. We'll eventually sand and stain the wood a fairly dark brown. But that won't be for a while (almost the last thing done).

Wood on the main stairs landing.

Also wood in the hallways on the second floor. All the bedrooms will be carpet and the bathrooms tile.

Cutouts for the vents. They may look small, but we wanted more a diffuser to limit the amount of dog hair and other dirt that ends up in the vents.
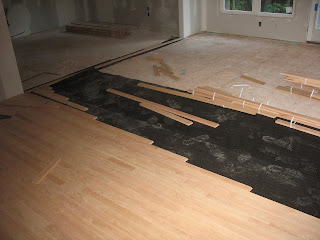
The staggered pattern for laying hardwood.

The great room with the wood all down (next day)

View from the dining room looking back into the great room. All the hardwood for the house was laid in two days.

We're using a mix of picture frame and stool and apron styles for the window trim. Our bathrooms are a little small (intentional) so we went with the slightly less intrusive picture frame there but with the more formal stool and apron elsewhere. (All about window trim trim here). This is a stool and apron trimmed window in the garage.

More stool and apron trimmed windows, but in the master bedroom.

A picture frame trimmed window in the master bathroom's "throne room".

Window in the guest room with its stool and apron without the head or side casings. This is the normal order they're installed which allows for a perfectly seated butt-joint by resting the side casings on the stool.

A follow-up picture to the rounded drywall edges on the kitchen arch.

Gutter installation started on the west side. Mostly the down spouts (click here for gutter terminology / installation) will be positioned to be on the sides and rear of the house to be less visible from the front.

Close up of a downspout and run on the outside of the greatroom (northwest corner). As you can see from the shadow in this picture, there's a lot of trees around the house, so the gutters will have the aptly named, "Leaf Solution". I don't know that I'll be able to get a good picture of that though.

Saturday, June 27, 2009

June 26,27, 2009: Cornice work and drywall

After some more travel I got out to the house on the 26th and 27th. Since mostly cleaning occured on the 27th, I've grouped together pictures from both days.

While I traveled, the cornices were mostly added with just the gutters to add. In the terminology, I'm used to, the cornice is the part of the roof that extends out beyond the wall and is made of of several parts including the fascia (flat part on end of roof line) and the soffits (on the bottom part of the roof overhang). The best conceptual picture I could find of the fascia and soffits was at this Bob Villa site, but its terminology doesn't jive with what I'm used to. What he calls a cornice, I would call a frieze with the frieze, fascia, soffit all part of the cornice.

Picture of the house from the tree at the northeast corner of the lot. Most of the final grading has been done except for right up against the house.
Closeup of some of the cornice work. The front facing pieces are the fascia and the pieces on the bottom are the soffits.

Different view of the house with the cornice work done.

In preparation for the final grading, the added cinder blocks were sealed to limit water penetration. After that dries for a few days (read as next week) the back fill will be completed and graded.

A few trees got nicked with during the brick laying. The bark was trimmed (to limit insect infestation) and sealed. We had actually noticed this earlier and had trimmed the bark but hadn't sealed the trees as the folks we spoke with suggested that sealing actually retarded healing (sorta like a bandaid).

Trim getting ready.

The beadboard ceiling for the front porch.

Danny mostly finished off the basement steps. There will be a railing on the right, but this is about all we will do on the steps.

View of the house from the back. In addition to the cornice work, you can see where the Hardie plank has been added for the master bedroom bumpout and great room dormer. Those parts couldn't be brick (at least at a reasonable price) because there was no direct support for the weight (actually the weight only matters while the mortar is setting). An interesting note for me is I was spelling Hardie plank as "Hardy plank" for years until a few weeks ago when I saw it spelled out for the first time. Basically, it's concrete fiberboard and is "hardier" in all the ways that matter as compared to vinyl and also looks better (the last part is my opinion). However, it's actually named for its inventor - James Hardie.

Close up of the master bedroom bumpout.

In the not so distant future, there will be a concrete pad underneath the side (rear, really) door entry to the garage. To support the pad, there will be a couple concrete piers which has been prepped in the square holes visible in the picture above.

The drywall was finishing up on Thursday. I just thought it was cool to see someone working on stilts.

If you looked closely at the previous picture you would see that the drywall around the arch appears rounded. That's because we're using bullnose archway beads around the arch. While we've seen it in a few houses in Lynchburg, apparently the pieces needed for it (seen above) were not available in Lynchburg so they had to be brought in.

The first interior door was hung - between the garage and the rest of the house. The kitchen (and most of the rest of the main level) is to the left as you enter. That's Kate in the background in the bathroom and Preethi's head is poking out.

Virtually all of the ducts are now connnected. (This is the same room where the earlier War of the Worlds tripod attack occurred).

Saturday, June 20, 2009

June 19, 2009: Bricks, roof, and drywall

Due to travel, Friday was the first chance I had to visit the house in about a week. During that time, the bricks were finished (except for the front steps which have to wait on the ground to settle as they’re not on the foundation), the shingles were finished, the last of the dry wall was hung with two courses of mudding and taping (one more course to go, then sanding), and the last air handler was installed in the basement.
View of the house from near the Northwest corner. The front porch with its two arches was completed. The arch is kind of a repeated design element as we replicated that launch angle of the arch in the arch that divides the kitchen from the great room. The cinder blocks you see are used because they’re cheaper and will either be below grade or covered with steps.

View from the driveway. The last part of the shingles that needed to be installed were the portions where the brick walls extend above a roofline. If you look closely, you can see the brick step flashing which is one of the various things added to either keep or vent water out from behind the brick.

View of the west gable where you can see the gable vent and where the shingles meet the brick.

Close up view of the brick flashing above the front entrance.

The airhandler in the basement (zone 2).

Some of the duct work in the basement.

Preethi walking up the stairs in the basement. We like the open stairs landing we have in our current townhouse and carried over that element to the new house.


Looking up the stairs into a bedroom.


One of the bedrooms on the second level.


Preethi walking into the master bedroom.
View of a bedroom on the second floor.

View of the great room.
View of the East attic gable vent through the opening to the attic.

Yet more dirt delivered for backfilling in around the foundation (think cinder blocks).

Friday, June 12, 2009

June 12, 2009: Bricks, Drywall, and a Gable Vent

Friday evening, we visited the lot with James and Kate. The bricks had finished off on the main east gable and the main north gable and had started on the entryway. Much more drywall had been hung as well. At this point, the remaining only remaining drywall to be hung appears to be in the master bedroom and in one of the upstairs bedrooms.

View of the house from the tree on the northeast corner of the lot. The white boxish looking thing is a gable vent that was added. There will be a matching one on the other side of the house.


Preethi and Kate step out onto the front porch. Bricks columns were added which will support arches.

Looking up the stairs where a bit of drywall was hung.

Preethi and Kate inspect the kitchen, which had the last part of the drywall hung.

Drywall in the laundry.
Kate inspects a closet in an upstairs bedroom.

Preethi steps into master bathroom.

Preethi stands in front of the throne room in the master bathroom.

View of the walls in the stairwell on the second level.